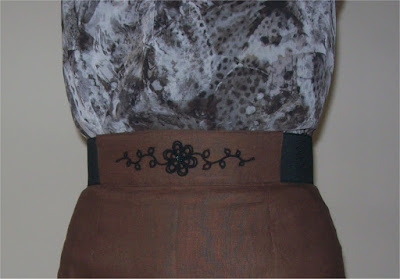
Tatting or Embroidery?
Which do you prefer? I love both, but in this case I used tatting as embroidery.
Let's see how:
Chiacchierino o Ricamo?
Cosa preferite? Io li amo entrambi, ma in questo caso ho utilizzato il chiacchierino come fosse un ricamo.
Vediamo come:
Materials:
Perlè no 8;
9 beads (2 mm);
2 shuttles;
crochet hook;
scissors;
embroidery needle.
Occorrente:
Perlè nr. 8;
9 perline (2 mm);
2 navette;
uncinetto;
forbici;
ago da ricamo.
Abbreviations:
Ring = R
Chain = C
double stitch = ds
picot = p
Josephine knot = JK (= Ring of 3s, using 3 times the first half of ds)
Reverse work = RW
Abbreviazioni:
Anello = AN
Arco = AR
nodino doppio = nd
picot = p
Nodo Giuseppina = NG (= Anello di 3n, utilizzando la prima metà del nd)
attaccarsi = att.
Chiudere e voltare = Ch. e volt.
Size: 15 cm x 4 cm
Dimensioni: 15 cm x 4 cm
You can see all images of this project here.
Potete vedere tutte le immagini di questo progetto qui.
Wind a shuttle and insert 9 beads on the thread (photo 1).
Work 1JK - slide a bead - 1JK. Tie the tails in order to obtain a circle. *Slide a bead again - work 1JK - join into the centre of the circle*.
Repeat from *to* 7 more times (photo 2). Tie the thread of the shuttle with the tail, so it will form a little ball of beads and Jks (photo 3). Work a R of 4ds - 1p - 10ds - 1p - 4ds. Close.
*R of 4ds - join to the previous p - 10ds - 1p - 4ds. Close.*
Repeat from *to* 4 more times. Cut and tie. Use these ends to fasten the central part to the motif with help of an embroidery needle.
Pass the thread of a shuttle through 1p and wind another shuttle with 30 cm of it (photo 4).
*Work a C of 16ds - join to the next p.*
Repeat from *to* 5 more times (photo 5).
After working the last C, work a C of 22ds - join to the next p.*
Repeat from *to* 5 more times (photo 6).
Avvolgete il filo sulla navetta e inserite 9 perline. (foto 1).
Lavorate 1NG - fate scivolare 1 perlina - 1NG. Legate i fili in modo da formare un cerchio. *Fate scivolare 1 perlina - lavorate 1NG - att. al centro del cerchio.*
Ripetete da *a* altre 7 volte (foto 2). Legate il filo della navetta con l'altra estremità, si formerà così una pallina di perline e NG (foto 3). Lavorate un AN di 4nd - 1p - 10nd - 1p - 4nd. Ch.
*AN di 4nd - att. al p precedente - 10nd - 1p - 4nd. Ch.*
Ripetere da *a* altre 4 volte. Tagliate e annodate i fili. Con l'ausilio di un ago da ricamo, utilizzate queste estremità per fissare la parte centrale al motivo.
Passate il filo di una navetta attraverso 1p e avvolgete circa 30 cm di filo su un'altra navetta (foto 4).
*Lavorate un AR di 16nd - att. al p successivo.*
Ripetere da *a* altre 5 volte (foto 5).
Dopo aver lavorato l'ultimo AR, eseguite un AR di 22nd - att. al p successivo*.
Ripetere da *a* altre 5 volte (foto 6).
When all C are made, continue working in this way:
Completati tutti gli AR, continuate così:
Tie the threads and RW (in this way the second shuttle always works as the second shuttle).
C of 6ds - 1p - 3ds - with the second shuttle R of 3ds - join to the p - 7ds - 1p - 10ds. Close. C of 8ds - 1p - 2ds - with the second shuttle R of 2ds - join to the p - 6ds - 1p - 8ds. Close.
Tie the threads and RW.
C of 6ds - 1p - 2ds - with the second shuttle R of 2ds - join to the p - 6ds - 1p - 8ds. Close. C of 6ds - 1p - 2ds - with the second shuttle R of 2ds - join to the p - 4ds - 1p - 6ds. Close.
Tie the threads and RW.
C of 5ds - 1p - 2ds - with the second shuttle R of 2ds - join to the p - 4ds - 1p - 6ds. Close.
C of 10ds - 1JK. Cut and tie.**
Work from **to** on the other side of the motif also.
**AR di 18nd - 1p - 3nd. Con la seconda navetta, lavorate un AN di 3nd - att. al p - 7nd - 1p – 10nd. Ch.
Legare i fili e volt. il lavoro (in questo modo la seconda navetta continuerà a lavorare come seconda navetta).
AR di 6nd - 1p - 3nd - con la seconda navetta AN di 3nd - att. al p - 7nd - 1p - 10nd. Ch. AR di 8nd - 1p - 2nd - con la seconda navetta AN di 2nd - att. al p - 6nd - 1p - 8nd. Ch.
Legare i fili e volt. il lavoro.
AR di 6nd - 1p - 2nd - con la seconda navetta AN di 2nd - att. al p - 6nd - 1p - 8nd. Ch. AR di 6nd - 1p - 2nd - con la seconda navetta AN di 2nd - att. al p - 4nd - 1p - 6nd. Ch.
Legare i fili e volt. il lavoro.
AR di 5nd - 1p - 2nd - con la seconda navetta AN di 2nd - att. al p - 4nd - 1p - 6nd. Ch.
AR di 10nd - 1NG. Tagliare e annodare i fili.**
Lavorate da **a** anche sull'altro lato del motivo.
Sew the motif onto the object that you want to decorate, for example a skirt.
Cucite il motivo su ciò che volete decorare, per esempio una gonna.


Bellissimo grazie!!!
RispondiEliminaFelice che ti piaccia :-)
Elimina