domenica 27 agosto 2017

Cutwork embroidery - Ricamo ad intaglio

Cutwork embroidery - Ricamo ad intaglio

Who loves embroidery, certainly knows the absolute beauty of cutwork embroidery, which, despite the simplicity of shapes and stitches, never misses to enchant.

The project I propose today is an insert that can be made both in the most classic version (white or écru only) and by adding some color notes as I did.

The drawing is available on my Designs page.


Chi ama ricamare, conosce indubbiamente l'assoluta bellezza del ricamo ad intaglio che, pur nella semplicità di forme e punti, non manca mai di incantare.

Il progetto che vi propongo oggi è un inserto che può essere realizzato sia nella versione più classica (solo in bianco o écru), sia con l'aggiunta di alcune note di colore come ho fatto io.

Il disegno è scaricabile dalla mia pagina Designs.


How to work...
Come si lavora...


The execution of cutwork embroidery involves several steps of processing:

  • Execution of the running stitch and bars;
  • Covering with buttonhole stitch;
  • Execution of other embroidery stitches, if present in the drawing;
  • The cutting of the fabric underneath the bars.


Who wants can use a frame to embroider, but this depends on how you prefer to work.
I find the use of the frame very useful when performing the running stitch and bars in order to keep the fabric well stretched, but I prefer to make buttonhole stitch without it.


L'esecuzione del ricamo ad intaglio prevede diverse fasi di lavorazione:

  • Esecuzione del punto filza e delle barrette;
  • Copertura con il punto festone;
  • Esecuzione di altri punti di ricamo, se presenti nel disegno;
  • Eliminazione della stoffa sottostante le barrette.


Chi lo desidera può utilizzare un telaio, ma questo dipende da come preferite lavorare.
Io trovo l'ausilio del telaio molto utile durante l'esecuzione del punto filza e delle barrette per mantenere il tessuto ben disteso, ma preferisco eseguire il punto festone senza telaio.

Running Stitch - Punto filza

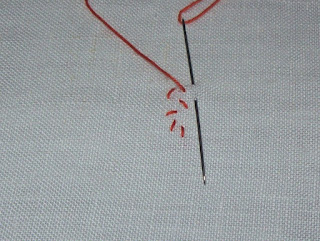
The first step is to delineate the outline of the drawing with a series of regular stitches. At this step, it is very important to choose from which parts of the design to start, as during the execution of the stitchs we will also have to work the bars.
It is possible to work the bars at any time, but I prefer to make them when the running stitch is already made on the other side, so I choose to work at first on the inner parts of the drawing.


Il primo passaggio consiste nel delineare il contorno del disegno con una serie di punti regolari. In questa fase è molto importante scegliere da quali parti del disegno iniziare poiché durante l'esecuzione del punto filza dovremo fare anche le barrette.
E' possibile lavorare sulle barrette in qualsiasi momento, ma io preferisco eseguirle quando dall'altro lato è già presente il punto filza, quindi scelgo inizialmente di lavorare sulle parti interne del disegno.

Running Stitch - Punto filza

Completed the outline, turn the work, and run a second series of stitches to cover the empty spaces left before.


Completato il contorno, ruotare il lavoro ed eseguire una seconda serie di punti per coprire gli spazi vuoti lasciati precedentemente.

 Running Stitch - Punto filza

In this way the outline of the drawing will be defined uniformly.

In questo modo il contorno del disegno verrà definito in maniera uniforme.

Running Stitch - Punto filza

giovedì 17 agosto 2017

Crochet placemat with tatting edging - Sottopiatto all'uncinetto con bordo a chiacchierino

Crochet placemat with tatting edging - Sottopiatto all'uncinetto con bordo a chiacchierino

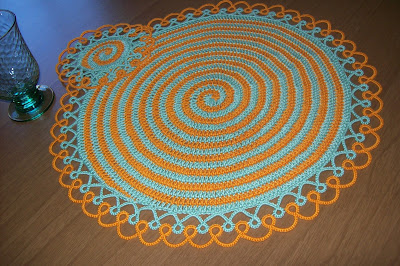
Today we complete the set to decorate our summer table by making the crochet placemat with tatting edging.

As the stitches to work are numerous, I tried to summarise the instructions in a few steps for each color; this requires a clarification on how to read the instructions below.

In the first step, you will read:
1dc - [2dc - (1dc x 3)] x 3

that means:
work 1dc over the next stitch - *2dc (= 1dc + 1dc as increase) over the next stitch - 1dc over the next stitch - 1dc over the next stitch - 1dc over the next stitch.*
Repeat from *to* 2 more times (i.e. 3 times in total).
At end of each round, insert a paper clip into the loop and change color.

Start working as you have made for the coaster until the point indicated for each color, then continue working:

Round 1 - Orange: 
1dc - [2dc - (dc x 3)] x 3
[2dc - (1dc x 4)] x 2
[2dc - (1dc x 5)] x 2
[2dc - (1dc x 6)] x 2

Round 2 - Green:
1dc - [2dc - (1dc x 2)] x 2
[2dc - (1dc x 5)] x 3
[2dc - (1dc x 6)] x 3
2dc - (1dc x 7)

Round 3 - Orange:
[2dc - (1dc x 7)] x 2
[2dc - (1dc x 8)] x 5

Round 4 - Green:
[2dc - (1dc x 7)] x 2
[2dc - (1dc x 8)] x 2
2dc - (1dc x 9)
[2dc - (1dc x 8)] x 3

Round 5 - Orange:
2dc - (1dc x 8)
[2dc - (1dc x 9)] x 5
[2dc - (1dc x 8)] x 2

Round 6 - Green:
[2dc - (1dc x 8)] x 3
2dc - (1dc x 7)
2dc - (1dc x 8)
2dc - (1dc x 7)
2dc - (1dc x 8)
2dc - (1dc x 7)
2dc - (1dc x 8)
2dc - (1dc x 7)

Round 7 - Orange:
2dc - (1dc x 7)
2dc - (1dc x 8)
2dc - (1dc x 7)
2dc - (1dc x 8)
2dc - (1dc x 7)
2dc - (1dc x 8)
[2dc - (1dc x 7)] x 4
2dc - (1dc x 6)
2dc - (1dc x 7)

Round 8 - Green:
2dc - (1dc x 7)
[2dc - (1dc x 6)] x 14

Round 9 - Orange:
2dc - (1dc x 6)
2dc - (1dc x 7)
2dc - (1dc x 6)
2dc - (1dc x 7)
[2dc - (1dc x 6)] x 13

Round 10 - Green:
[2dc - (1dc x 6)] x 20

Round 11 - Orange:
[2dc - (1dc x 6)] x 2
[2dc - (1dc x 16)] x 7
2dc - (1dc x 3)

Round 12 - Green:
2dc - (1dc x 6)
[2dc - (1dc x 16)] x 3
2dc - (1dc x 63)
2dc - (1dc x 26)

Round 13 - Orange:
(1dc x 86)
2dc - (1dc x 90)

Round 14 - Green:
(1dc x 30)
2dc - (1dc x 27)
2dc - (1dc x 14)
2dc - (1dc x 18)
2dc - (1dc x 19)
2dc - (1dc x 13)
2dc - (1dc x 14)
2dc - (1dc x 12)
2dc - (1dc x 24)

Round 15 - Orange:
(1dc x 6)
2dc - (1dc x 24)
2dc - (1dc x 20)
[2dc - (1dc x 13)] x 2
2dc - (1dc x 19)
2dc - (1dc x 16)
2dc - (1dc x 17)
2dc - (1dc x 14)
2dc - (1dc x 13)
2dc - (1dc x 3)
(1hdc x 10)
1hdc + 1sc (insert the hook into the same stitch)
(1sc x 6)
(1sl st. x 3)
Cut the thread and fasten off.

Round 16 - Green:
2dc - (1dc x 14)
2dc - (1dc x 7)
2dc - (1dc x 12)
[2dc - (1dc x 10)] x 2
2dc - (1dc x 7)
2dc - (1dc x 22)
2dc - (1dc x 7)
2dc - (1dc x 12)
2dc - (1dc x 7)
2dc - (1dc x 9)
2dc - (1dc x 13)
2dc - (1dc x 11)
2dc - (1dc x 8)
2dc - (1dc x 14)
1dc + 1hdc (insert the hook into the same stitch)
(1hdc x 6)
(1sc x 12)
(1sl st x 4)
Cut the thread and fasten off.
L'ultimo giro completo ha un totale di 223 maglie.
The last complete round has 223 stitches in total.

For tatting edging.

With the green yarn work:
Ring of 3ds - 1p - 6ds - 1p - 3ds. Close and reverse work.
Chain of 6ds - join to 1 stitch of the last round of the spiral - 6ds. Reverse work.
*Ring of 3ds - 1p - 6ds - 1p - 3ds. Close and reverse work.
Chain of 6ds - skip 4 stitches of the last round of the spiral and join to the next - 6ds. Reverse work.*
Repeat from *to* all around.
For two last spaces, skip 3 stitches instead of 4.
Cut and tie.
With orange yarn work:
*Ring of 5ds - join to the p of the green ring - 6ds - join to the p of the next ring - 5ds. Close and reverse work.
Chain of 15ds. Reverse work.*
Repeat from *to* all around. Cut and tie.


Oggi completiamo il set per decorare la nostra tavola estiva realizzando il sottopiatto all'uncinetto con bordo a chiacchierino.

Poichè le maglie da lavorare sono numerose, ho cercato di condensare le indicazioni in pochi passaggi per ciascun colore; ciò richiede una precisazione su come leggere le istruzioni riportare di seguito.

Nel primo passaggio, leggerete:
1m.a. - [2m.a. - (1m.a. x 3)] x 3

che significa:
lavorate 1m.a. sulla maglia successiva - *2m.a. (cioè 1m.a. + 1m.a. di aumento) sulla maglia successiva - 1m.a. sulla maglia successiva - 1m.a. sulla maglia successiva - 1m.a. sulla maglia successiva.*
Ripetere da *a* altre 2 volte (3 volte in totale).
Ad ogni giro inserite una graffetta nel cappio formato dall'uncinetto e cambiate colore.

Iniziate la lavorazione come avete già fatto per il sottobicchiere fino al punto indicato per ciascun colore, quindi continuate lavorando:

Giro 1 - Arancione: 
1m.a. - [2m.a. - (1m.a. x 3)] x 3
[2m.a. - (1m.a. x 4)] x 2
[2m.a. - (1m.a. x 5)] x 2
[2m.a. - (1m.a. x 6)] x 2

Giro 2 - Verde:
1m.a. - [2m.a. - (1m.a. x 2)] x 2
[2m.a. - (1m.a. x 5)] x 3
[2m.a. - (1m.a. x 6)] x 3
2m.a. - (1m.a. x 7)

Giro 3 - Arancione:
[2m.a. - (1m.a. x 7)] x 2
[2m.a. - (1m.a. x 8)] x 5

Giro 4 - Verde:
[2m.a. - (1m.a. x 7)] x 2
[2m.a. - (1m.a. x 8)] x 2
2m.a. - (1m.a. x 9)
[2m.a. - (1m.a. x 8)] x 3

Giro 5 - Arancione:
2m.a. - (1m.a. x 8)
[2m.a. - (1m.a. x 9)] x 5
[2m.a. - (1m.a. x 8)] x 2

Giro 6 - Verde:
[2m.a. - (1m.a. x 8)] x 3
2m.a. - (1m.a. x 7)
2m.a. - (1m.a. x 8)
2m.a. - (1m.a. x 7)
2m.a. - (1m.a. x 8)
2m.a. - (1m.a. x 7)
2m.a. - (1m.a. x 8)
2m.a. - (1m.a. x 7)

Giro 7 - Arancione:
2m.a. - (1m.a. x 7)
2m.a. - (1m.a. x 8)
2m.a. - (1m.a. x 7)
2m.a. - (1m.a. x 8)
2m.a. - (1m.a. x 7)
2m.a. - (1m.a. x 8)
[2m.a. - (1m.a. x 7)] x 4
2m.a. - (1m.a. x 6)
2m.a. - (1m.a. x 7)

Giro 8 - Verde:
2m.a. - (1m.a. x 7)
[2m.a. - (1m.a. x 6)] x 14

Giro 9 - Arancione:
2m.a. - (1m.a. x 6)
2m.a. - (1m.a. x 7)
2m.a. - (1m.a. x 6)
2m.a. - (1m.a. x 7)
[2m.a. - (1m.a. x 6)] x 13

Giro 10 - Verde:
[2m.a. - (1m.a. x 6)] x 20

Giro 11 - Arancione:
[2m.a. - (1m.a. x 6)] x 2
[2m.a. - (1m.a. x 16)] x 7
2m.a. - (1m.a. x 3)

Giro 12 - Verde:
2m.a. - (1m.a. x 6)
[2m.a. - (1m.a. x 16)] x 3
2m.a. - (1m.a. x 63)
2m.a. - (1m.a. x 26)

Giro 13 - Arancione:
(1m.a. x 86)
2m.a. - (1m.a. x 90)

Giro 14 - Verde:
(1m.a. x 30)
2m.a. - (1m.a. x 27)
2m.a. - (1m.a. x 14)
2m.a. - (1m.a. x 18)
2m.a. - (1m.a. x 19)
2m.a. - (1m.a. x 13)
2m.a. - (1m.a. x 14)
2m.a. - (1m.a. x 12)
2m.a. - (1m.a. x 24)

Giro 15 - Arancione:
(1m.a. x 6)
2m.a. - (1m.a. x 24)
2m.a. - (1m.a. x 20)
[2m.a. - (1m.a. x 13)] x 2
2m.a. - (1m.a. x 19)
2m.a. - (1m.a. x 16)
2m.a. - (1m.a. x 17)
2m.a. - (1m.a. x 14)
2m.a. - (1m.a. x 13)
2m.a. - (1m.a. x 3)
(1m.m.a. x 10)
1m.m.a. + 1m.b (lavorate puntando l'uncinetto nello stessa maglia)
(1m.b. x 6)
(1m.bss. x 3)
Tagliare e affrancare il filo.

Giro 16 - Verde:
2m.a. - (1m.a. x 14)
2m.a. - (1m.a. x 7)
2m.a. - (1m.a. x 12)
[2m.a. - (1m.a. x 10)] x 2
2m.a. - (1m.a. x 7)
2m.a. - (1m.a. x 22)
2m.a. - (1m.a. x 7)
2m.a. - (1m.a. x 12)
2m.a. - (1m.a. x 7)
2m.a. - (1m.a. x 9)
2m.a. - (1m.a. x 13)
2m.a. - (1m.a. x 11)
2m.a. - (1m.a. x 8)
2m.a. - (1m.a. x 14)
1m.a. + 1m.m.a. (lavorate puntando l'uncinetto nello stessa maglia)
(1m.m.a. x 6)
(1m.b. x 12)
(1m.bss. x 4)
Tagliare e affrancare il filo.
L'ultimo giro completo ha un totale di 223 maglie.

Per il bordo a chiacchierino.

Con il filo verde lavorate:
Anello di 3nd - 1p - 6nd - 1p - 3nd. Chiudere e voltare il lavoro.
Arco di 6nd - attaccarsi a una maglia dell'ultimo giro della spirale - 6nd. Voltare il lavoro.
*Anello di 3nd - 1p - 6nd - 1p - 3nd. Chiudere e voltare il lavoro.
Arco di 6nd - saltare 4 maglie dell'ultimo giro della spirale e attaccarsi nel punto successivo - 6nd. Voltare il lavoro.*
Ripetere da *a* tutto intorno.
Per gli ultimi due spazi saltare 3 maglie invece di 4.
Tagliare e annodare i fili.
Con il filo arancione lavorate:
*Anello di 5nd - attaccarsi al p dell'anello verde - 6nd - attaccarsi al p dell'anello successivo - 5nd. Chiudere e voltare il lavoro.
Arco di 15nd. Voltare il lavoro.*
Ripetere da *a* tutto intorno. Tagliare e annodare i fili.

venerdì 4 agosto 2017

Crochet coaster with tatting edging - Sottobicchiere all'uncinetto con bordo a chiacchierino.

Crochet coaster with tatting edging - Sottobicchiere all'uncinetto con bordo a chiacchierino.

As anticipated in the previous post, today we begin to realize the crochet placemat and coaster set with tatting edging.

The first part of this project is the creation of the crochet spiral, so we will need:
two different colors of yarn size 5;
crochet hook size 3,5 mm;
a paper clip.

Get started with a magic loop and continue alternating the processing between the two colors. The spiral consists only of double chochet stitches (= dc), so it is very easy to work, but in order to obtain well-defined start and end, it is necessary to use a gradation of stitches, which also includes the use of:


Another important element is the increase of the stitch, which is essential to correctly carry out the spiral evolution.
For the beginners, who equally want to realize this project, I remind you that by clicking on the stitches name used, you can read the respective tutorials.

Hope you like it!
Happy crochet everybody!


Come anticipato nel post precedente, oggi iniziamo a realizzare il set composto da un sottobicchiere e un sottopiatto all'uncinetto con bordo di finizione a chiacchierino.

La prima parte di questo progetto consiste nella realizzazione della spirale all'uncinetto, per la quale ci serviranno:
due colori differenti di filato nr. 5;
un uncinetto misura 3,5 mm;
una graffetta.

Si inizia con un anello magico e si prosegue alternando la lavorazione tra i due colori. La spirale è composta esclusivamente da maglie alte ( = m.a.), quindi molto facile da lavorare, ma per ottenere un inizio e una fine ben definiti è necessario utilizzare una gradazione di punti che prevede anche l'impiego di:


Un altro elemento di fondamentale importanza è l'aumento della maglia, indispensabile per eseguire correttamente l'evoluzione della spirare.
Per chi è alle prime armi con l'uncinetto, ma desidera ugualmente mettersi all'opera con questo progetto, vi ricordo che cliccando sul nome dei punti utilizzati potrete visualizzare i rispettivi tutorials.

Spero vi piaccia!
Non mi resta che augurarvi buon lavoro... e buon divertimento!


Instructions/Istruzioni:

With green yarn make a magic loop - 1ch - 2sc - 2hdc - 2dc - 2tr. Insert a paper clip into the loop and take the orange yarn, then work into the magic loop 1ch - 1sc - 1hdc - 1dc - 1tr.
Close magic loop and, without to change color, work 2dc over the first green sc - 1dc over the second green sc and continue with 2dc (this is an increase that means to work 1dc + 1dc over the same stitch of the previous round; hereafter every increase will be indicated in this way) - 1dc - 2dc - 1dc - 2dc x 2 times.
Insert the paper clip into the orange loop and work again with the green yarn 2dc over the sc of the previous round, then work (1dc - 2dc) x 5 times - 2dc - 1dc - 2dc x 2 times - 1dc. Insert the paper clip and change color again. 
With orange yarn work (1dc - 2dc - 2dc) x 5 times - 1dc - 2dc. Insert the paper clip.
The placemat is worked at the same way regarding the orange yarn until here.
With green yarn work (2dc - 2dc - 1dc) x 9 times. Insert the paper clip.
The placemat is worked at the same way regarding the green yarn until here.
Now we have to complete the spiral with the orange yarn working a gradation of stitches in this way: 1dc + 1hdc over the same stitch - 1hdc - 1hdc + 1sc over the same stitch - 1sc x 2 times - 1sl st x 2 times.
Cut and fasten off.
With the green yarn 1dc + 1hdc over the same stitch - 2hdc - 1sc - 2sc - 1sc x 8 times - 1sl st.
Cut and fasten off.
The last complete round has 60 stitches in total.


Con il colore verde iniziate formando un anello magico e poi lavorate 1cat. - 2m.b. - 2m.m.a. - 2m.a. - 2m.ass. Inserite una graffetta nel cappio e prendete il filo di colore arancione, quindi lavorate, sempre nell'anello magico, 1cat. - 1m.b. - 1m.m.a. - 1m.a. - 1m.ass.
Chiudete l'anello magico e senza cambiare colore continuate a lovorare 2m.a. sulla prima m.b. verde - 1m.a. sulla seconda m.b. verde, proseguite lavorando 2m.a. (questo è un aumento e ciò significa che dovete lavorare 1m.a. + 1m.a. puntando l'uncinetto nello stesso punto del giro precedete; da qui in poi ogni aumento sarà indicato così) - 1m.a. - 2m.a. - 1m.a. - 2m.a. x 2 volte.
Inserite la graffetta nel cappio formato dal filo arancione e riprendete a lavorare con il verde 2m.a. nella m.b. sottostante, continuate lavorando (1m.a. - 2m.a.) x 5 volte - 2m.a. - 1m.a. - 2m.a. x 2 volte - 1m.a. Inserite la graffetta e cambiate di nuovo colore.
Con il filo arancione lavorate (1m.a. - 2m.a. - 2m.a.) x 5 volte - 1m.a. - 2m.a. Inserite la graffetta.
Fino a questo punto, il sottopiatto è lavorato allo stesso modo per quanto riguarda il colore arancione.
Riprendete il verde e lavorate (2m.a. - 2m.a. - 1m.a.) x 9 volte. Inserite la graffetta.
Fino a questo punto, il sottopiatto è lavorato allo stesso modo per quanto riguarda il colore verde.
Adesso completiamo la spirale con il filo arancione lavorando una gradazione di punti in questo modo: 1m.a. + 1m.m.a. sulla stessa maglia di base - 1m.m.a. - 1m.m.a. + 1m.b. sulla stessa maglia di base - 1m.b. x 2 volte - 1m.bss. x 2 volte.
Tagliare i affrancare il filo.
Riprendete il colore verde e lavorate 1m.a. + 1m.m.a. sulla stessa maglia di base - 2m.m.a. - 1m.b. - 2m.b. - 1m.b. x 8 volte - 1m.bss.
Tagliare e affrancare il filo.
L'ultimo giro completo ha un totale di 60 maglie.


Tatting diagram - Schema a chiacchierino
Once finished the crochet spiral, work a tatting edging beginnig with the green yarn.
Ring of 3ds - 1p - 6ds - 1p - 3ds. Close and reverse work.
Chain of 5ds - join to 1st of the last round of the spiral - 5ds. Reverse work.
*Ring of 3ds - 1p - 6ds - 1p - 3ds. Close and reverse work.
Chain of 5ds - skip 3 stitches of the last round of the spiral and join to the next - 5ds. Reverse work.*
Repeat from *to* all around. Cut and tie.
With orange yarn work:
*ring of 5ds - join to the p of the green ring - 6ds - join to the p of the next ring - 5ds. Close and reverse work.
Chain of 12ds. Reverse work.*
Repeat from *to* all around. Cut and tie.


Una volta completata la spirale all'uncineto, lavorate un bordo a chiacchierino iniziando con il filo verde.
Anello di 3nd - 1p - 6nd - 1p - 3nd. Chiudere e voltare il lavoro.
Arco di 5nd - attaccarsi a una maglia dell'ultimo giro della spirale - 5nd. Voltare il lavoro.
*Anello di 3nd - 1p - 6nd - 1p - 3nd. Chiudere e voltare il lavoro.
Arco di 5nd - saltare 3 maglie dell'ultimo giro della spirale e attaccarsi nel punto successivo - 5nd. Voltare il lavoro.*
Ripetere da *a* tutto intorno. Tagliare e annodare i fili.
Con il filo arancione lavorate:
*Anello di 5nd - attaccarsi al p dell'anello verde - 6nd - attaccarsi al p dell'anello successivo - 5nd. Chiudere e voltare il lavoro.
Arco di 12nd. Voltare il lavoro.*
Ripetere da *a* tutto intorno. Tagliare e annodare i fili.