Starting to work without knot and without the continuous thread (i.e. divided on both shuttles without interruption), can always be useful, especially if we want to work with two different colors.
Iniziare a lavorare senza nodi e senza il filo continuo (cioè diviso su entrambe le navette senza interruzione), può essere sempre utile, in particolare se vogliamo lavorare con due colori diversi.
How to make.
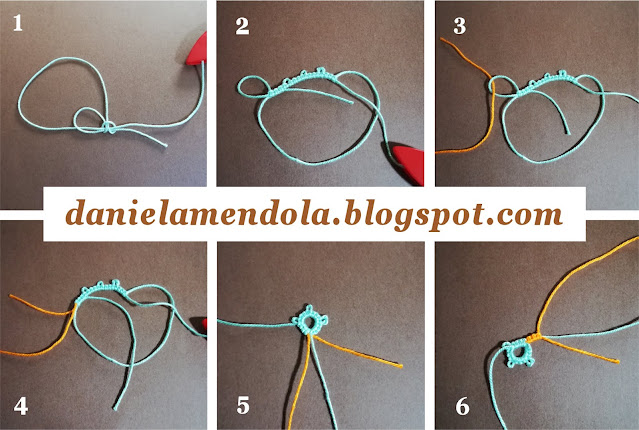
Step 1 - With the first shuttle, start to work a ring by hiding the end inside the first three double stitches (to see how to hide the starting ends, see this video), but being careful to leave a small loop as shown in the Photo 1;
Step 2 - Complete the number of double stitches of the ring (Photo 2);
Step 3 - Pass the thread of the second shuttle, through the loop formed by the thread of the hidden end inside the first three double stitches (Photo 3);
Step 4 - Pull the thread of the end so that it slides inside the first three double stitches and close the loop (Photo 4);
Step 5 - At this point the ring is closed and the second shuttle is hooked to its base (Photo 5);
Step 6 - Reverse work and make the chain as usual, hiding the second end inside the first three double stitches (Photo 6).
Come fare.
Step 1 - Con la prima navetta, iniziate a lavorare un anello nascondendo l'estremità all'interno dei primi tre nodini doppi (per vedere come nascondere le estremità iniziali, guardate questo video), facendo però attenzione a lasciare una piccola asola come mostrato nella Foto 1;
Step 2 - Completate il numero dei nodini dell'anello (Foto 2);
Step 3 - Passate il filo della seconda navetta, attraverso l'asola formata dal filo dell'estremità nascosta all'interno dei primi tre nodini doppi (Foto 3);
Step 4 - Tirate il filo dell'estremità in modo che scorra attraverso i primi tre nodini e chiudete l'asola (Foto 4);
Step 5 - A questo punto l'anello è chiuso e la seconda navetta è agganciata alla sua base (Foto 5);
Step 6 - Voltate il lavoro e lavorate l'arco normalmente, nascondendo la seconda estremità all'interno dei primi tre nodini doppi (Foto 6).


I love your idea, very helpful. thank you for sharing.
RispondiEliminaMany thanks! Happy you like my post.
EliminaVery clear, thanks.
RispondiEliminaThank you very much!
EliminaThat’s the way I do it too! http://janeeborall.freeservers.com/StartRingCatchThread2.pdf
RispondiEliminaIt's very simple and useful!
EliminaYes, that's what I showed here http://janeeborall.freeservers.com/StartRingCatchThread2.pdf back in 2019. So good to see you're using it too. An excellent way to start any piece of tatting. Perhaps you could do a piece on finishing using this method? http://janeeborall.freeservers.com/HidingEndsNoKnot.pdf
RispondiEliminaI'll try it. Thank you very much!
Elimina👍 💕
RispondiEliminaKisses!
Elimina