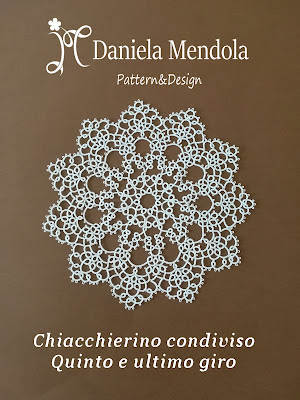
Size: diameter cm 21
Previous rounds:
Round 1
Round 2
Round 3
Round 4
Abbreviations:
Ring = R
Chain = C
double stitch = ds
picot = p
Reverse work = RW
Dimensione: diametro cm 21
Giri precedenti:
Giro 1
Giro 2
Giro 3
Giro 4
Abbreviazioni:
Anello = AN
Arco = AR
nodino doppio = nd
picot = p
attaccare = att.
Chiudere e voltare = Ch. e volt.
With 110 "likes" against 17 "hearts", version 1 wins the fifth challenge.
Round 5: It is worked with two shuttles starting from red R.
Work a *R of 6ds - join to the p of the C of the previous round - 6ds. Close and RW.
C of 3ds - 3p separated by 3ds - 3ds. RW.
R of 6ds - join to the first p of the next C - 6ds. Close and RW.
C of 4ds - 1p - 4ds. RW.
R of 6ds - join to the central p of the same C - 2ds - 1p - 4ds. Close and RW.
C of 4ds - 3p separated by 3ds - 4ds. RW.
R of 4ds - join to the p of the previous R - 2ds - join to the central p of the C - 6ds. Close and RW.
C of 4ds - 1p - 4ds. RW.
R of 6ds - join to the third p of the C - 6ds. Close and RW.
C of 3ds - 3p separated by 3ds - 3ds. RW.
R of 6ds - join to the p of the next C - 6ds. Close and RW.
C of 3ds - 3p separated by 3ds - 7ds - join to the p of the next C.
C of 6ds - join to the central p of the R of the previous round.
C of 6ds - join to the p of the next C.
C of 7ds - join to the last p of the previous C - 3ds - 2p separated by 3ds - 3ds. RW.*
Repeat from *to* 10 more times. Cut and tie.
Con 110 "like" contro 17 "cuoricini", la versione 1 ha vinto la quinta sfida.
Giro 5: si lavora con due navette partendo dall'AN rosso.
Lavorare un *AN di 6nd - att. al p dell'AR del giro precedente - 6nd. Ch. e volt.
AR di 3nd - 3p divisi da 3nd - 3nd. Volt.
AN di 6nd - att. al primo p dell'AR successivo - 6nd. Ch. e volt.
AR di 4nd - 1p - 4nd. Volt.
AN di 6nd - att. al p centrale dello stesso AR - 2nd - 1p - 4nd. Ch. e volt.
AR di 4nd - 3p divisi da 3nd - 4nd. Volt.
AN di 4nd - att. al p dell'AN precedente - 2nd - att. al p centrale dell'AR - 6nd. Ch. e volt.
AR di 4nd - 1p - 4nd. Volt.
AN di 6nd - att. al terzo p dell'AR - 6nd. Ch. e volt.
AR di 3nd - 3p divisi da 3nd - 3nd. Volt.
AN di 6nd - att. al p dell'AR successivo - 6nd. Ch. e volt.
AR di 3nd - 3p divisi da 3nd - 7nd - att. al p dell'AR successivo.
AR di 6nd - att. al p centrale dell'AN del giro precedente.
AR di 6nd - att. al p dell'AR successivo.
AR di 7nd - att. all'ultimo p dell'AR precedente - 3nd - 2p divisi da 3nd - 3nd. Volt.*
Ripetere da *a* altre 10 volte. Tagliare e annodare i fili.


Thank you so much for this very unique tat-a-long. I am just getting started, but love your designs!! :)
RispondiEliminaI'm very happy you like my design, thank you very much! :-)
Eliminagrazie Daniela. Quando finisco, ti mando il lavoro. è stato un piacere lavorare insieme con la tua direttiva e creatività
RispondiEliminaGrazie mille, anche per me è stato un piacere lavorare insieme a tutte voi :-) Non vedo l'ora di ammirare il tuo lavoro!
EliminaHi Daniela 🙂, first of all, thank you for such a beautiful design for free!
RispondiEliminaI'm now in the final round and wondering, what kind of join did you use between 7 ds and 6 ds (and the next two joins). Is it the regular lock join? What I initially did was I pulled the core thread through the picot and passed the ball thread shuttle through this loop. But I guess that's not the classical way of doing it 😅. I would appreciate your help on this one. Once again, thank you for the pattern!
Best wishes,
Anna
Thank you very much for your kind comment :-) in this case, I used a simple join as described in my post about the joins. It is not a LJ. To read my article, click on Tutorials > Step 17, slide the page until the 3rd photo. That is the simple join with broken chains. Hope I was helpful. Hugs!
EliminaDear Daniela, thank you for your advise (and for the visual tutorial, which always helps a lot in learning! 🤓). Now I will be able to finish this beautiful piece 🤩.
RispondiEliminaBest wishes,
Anna
I'm very happy :-) Hugs!
Elimina