Pagine

sabato 27 marzo 2021

The second challenge - La seconda sfida


The second challenge - La seconda sfida


Are you ready for the second challenge?

If you want to play, read the rules by clicking here.

I am waiting for you on my Facebook profile to vote and remind you that you can vote until 9:00 pm on Wednesday.


Pronti per la seconda sfida?

Se volete giocare, leggete il regolamento cliccando qui.

Io vi aspetto sul mio profilo Facebook per la votazione e vi ricordo che potete votare fino alle ore 21:00 di mercoledì.


giovedì 25 marzo 2021

Tatting sharing 2: round 1 - Chiacchierino condiviso 2: giro 1


Tatting sharing 2: round 1 - Chiacchierino condiviso 2: giro 1

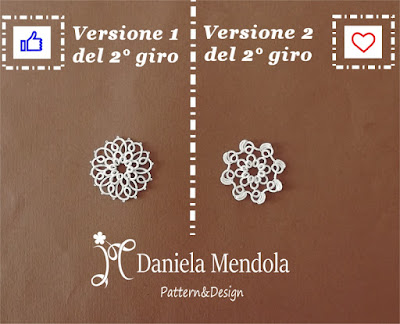
With 158 "likes" against 59 "hearts", there is no doubt: version 1 wins the first challenge.


Con 158 "like" contro 59 "cuoricini", non ci sono dubbi: la versione 1 vince la prima sfida..


Materials:
Cordonnet size 30, ecru color;
1 shuttle;
crochet hook;
scissors.

Abbreviations:
Ring = R
double stitch = ds
picot = p


Occorrente:
Cordonetto nr. 30, colore écru;
1 navetta;
uncinetto;
forbici.

Abbreviazioni:
Anello = AN
nodino doppio = nd
picot = p
attaccare = att.
Chiudere = Ch.

Tatting sharing 2: round 1 - Chiacchierino condiviso 2: giro 1

Round 1: it is worked with one single shuttle, starting from red R.
R of 6ds - 3p separated by 9ds - 6ds. Close.
R of 9ds - place this ring over the previous one and join to the last p of the latter (as shown in the photo 1) - 9ds. Close.
*R of 6ds - place this ring under the previous one and join to the same p as before (as shown in the photo 2) - 9ds - 2p separated by 9ds - 6ds. Close.
R of 9ds - place this ring over the previous one and join to the last p of the latter - 9ds. Close.*
Repeat from *to* 6 more times, joining the last large ring to the first one.
To work the last small ring easier, you can fold the motif in half.
At the end cut and tie.

See you for the next challenge!


Giro 1: si lavora con 1 navetta, iniziando dall'AN rosso.
AN di 6nd - 3p divisi da 9nd - 6nd. Ch.
AN di 9nd - posizionare questo anello sopra il precedente e att. all'ultimo p di quest'ultimo (come mostrato nella foto 1) - 9nd. Ch.
*AN di 6nd - posizionare questo anello sotto il precedente e att. allo stesso p di prima (come mostrato nella foto 2) - 9nd - 2p divisi da 9nd - 6nd. Ch.
AN di 9nd - posizionare questo anello sopra il precedente e att. all'ultimo p di quest'ultimo - 9nd. Ch.*
Ripetere da *a* alte 6 volte, unendo l'ultimo anello grande al primo.
Per lavorare l'ultimo anello piccolo più facilmente, piegate il motivo a metà.
Alla fine tagliare e annodare i fili.

Ci vediamo per la prossima sfida!

Tatting sharing 2: round 1 - Chiacchierino condiviso 2: giro 1


Tatting sharing 2: round 1 - Chiacchierino condiviso 2: giro 1

sabato 20 marzo 2021

The first challenge - La prima sfida


The first challenge - La prima sfida

Today the second edition of the Tatting sharing begins. 

To see the doily of the first edition, click here.

First day and first challenge!

Which version will win?

If you want to play, read the rules by clicking here.

I am waiting for you on my Facebook profile to vote and remind you that you can vote until 9:00 pm on Wednesday.


Oggi inizia la seconda edizione del Chiacchierino condiviso. 

Per il centrino della prima edizione, cliccate qui.

Primo giorno e prima sfida!

Quale versione vincerà?

Se volete giocare, leggete il regolamento cliccando qui.

Io vi aspetto sul mio profilo Facebook per la votazione e vi ricordo che potete votare fino alle ore 21:00 di mercoledì.

giovedì 18 marzo 2021

How to start without knot and without continuous thread - Come iniziare senza nodi e senza filo continuo


How to start without knot and without continuous thread - Come iniziare senza nodi e senza filo continuo


Starting to work without knot and without the continuous thread (i.e. divided on both shuttles without interruption), can always be useful, especially if we want to work with two different colors.


Iniziare a lavorare senza nodi e senza il filo continuo (cioè diviso su entrambe le navette senza interruzione), può essere sempre utile, in particolare se vogliamo lavorare con due colori diversi.


How to make.

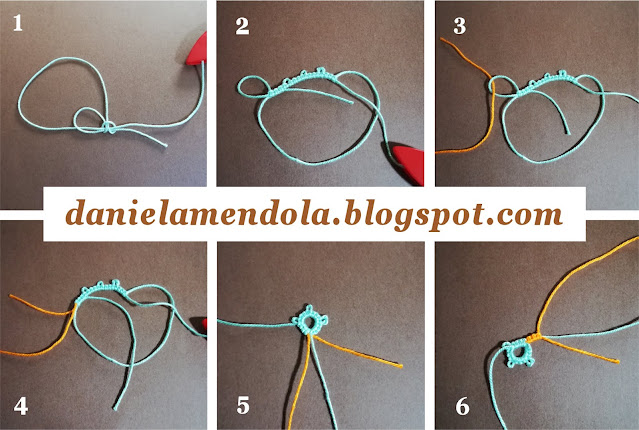
Step 1 - With the first shuttle, start to work a ring by hiding the end inside the first three double stitches (to see how to hide the starting ends, see this video), but being careful to leave a small loop as shown in the Photo 1;

Step 2 - Complete the number of double stitches of the ring (Photo 2);

Step 3 - Pass the thread of the second shuttle, through the loop formed by the thread of the hidden end inside the first three double stitches (Photo 3);

Step 4 - Pull the thread of the end so that it slides inside the first three double stitches and close the loop (Photo 4);

Step 5 - At this point the ring is closed and the second shuttle is hooked to its base (Photo 5);

Step 6 - Reverse work and make the chain as usual, hiding the second end inside the first three double stitches (Photo 6).


Come fare.

Step 1 - Con la prima navetta, iniziate a lavorare un anello nascondendo l'estremità all'interno dei primi tre nodini doppi (per vedere come nascondere le estremità iniziali, guardate questo video), facendo però attenzione a lasciare una piccola asola come mostrato nella Foto 1;

Step 2 - Completate il numero dei nodini dell'anello (Foto 2);

Step 3 - Passate il filo della seconda navetta, attraverso l'asola formata dal filo dell'estremità nascosta all'interno dei primi tre nodini doppi (Foto 3);

Step 4 - Tirate il filo dell'estremità in modo che scorra attraverso i primi tre nodini e chiudete l'asola (Foto 4);

Step 5 - A questo punto l'anello è chiuso e la seconda navetta è agganciata alla sua base (Foto 5);

Step 6 - Voltate il lavoro e lavorate l'arco normalmente, nascondendo la seconda estremità all'interno dei primi tre nodini doppi (Foto 6).

How to start without knot and without continuous thread - Come iniziare senza nodi e senza filo continuo


mercoledì 17 marzo 2021

Tatting sharing 2 - Chiacchierino condiviso 2


Tatting sharing 2 - Chiacchierino condiviso 2

Tatting sharing is coming with a second edition and new rules!

For those who did not participate in the first edition, here is what you need to know about the Tatting sharing:

What is Tatting sharing?

It's a game.

Who can participate?

Anyone who wants it.

Where is it played?

On my Facebook profile.

What are the rules of the game?

Here is the NEW REGULATION:

  1. purpose of the game is to create together a tatting doily pattern;
  2. at each appointment, established from time to time, I will publish in Facebook profile a post with two different versions for each round;
  3. everyone will be able to vote for the preferred version with a "like" or a "heart", any other smiley face will be assigned to the version that has obtained the fewest votes;
  4. the votes expressed in the comments will not be valid for the purposes of the final count;
  5. only the votes cast on the post published on my profile will be valid;
  6. there will be 4 days to vote;
  7. the version that will have won (and only that) will be published, with diagram and instructions, in my blog;
  8. I will make the doily with cordonnet thread size 30 ecru color, whoever wants to make it together with me will have to choose the desired thread;
  9. at the end of the game, you 'll be able to send me the photo of your work, and I will insert it inside the dedicated album "Tatting sharing 2".

I will publish the first post for voting on Saturday 20 March, I am waiting for you on my Facebook profile!


Torna il Chiacchierino condiviso con una seconda edizione e nuove regole!

Per coloro che non hanno partecipato alla prima edizione, ecco ciò che serve sapere sul Chiacchierino condiviso:

Che cos'è il Chiacchierino condiviso?

E' un gioco.

Chi può partecipare?

Chiunque lo desidera.

Dove si gioca?

Sul mio profilo Facebook.

Quali sono le regole del gioco?

Ecco il NUOVO REGOLAMENTO:

  1. lo scopo del gioco è di creare insieme lo schema di un centrino a chiacchierino;
  2. ad ogni appuntamento, stabilito di volta in volta, pubblicherò sul mio profilo Facebook un post con due versioni diverse per ciascun giro;
  3. tutti potranno votare la versione preferita con un "like" o un "cuoricino", eventuali altre faccine verranno assegnate alla versione che avrà ottenuto meno voti; 
  4. i voti espressi nei commenti non saranno validi ai fini del conteggio finale;
  5. solo i voti espressi sul post pubblicato sul mio profilo saranno validi;
  6. ci saranno 4 giorni di tempo per votare;
  7. la versione che avrà vinto (e solo quella) verrà pubblicata, con schema e istruzioni, nel mio blog;
  8. io realizzerò il centrino con il cordonetto nr. 30 di colore écru, chi vorrà realizzarlo insieme a me potrà scegliere il filato desiderato. 
  9. alla fine del gioco, potrete inviarmi la foto del vostro lavoro e io la inserirò nell'album dedicato "Chiacchierino condiviso 2".

Pubblicherò il primo post per la votazione sabato 20 Marzo, Vi aspetto sul mio profilo Facebook!