Pagine

martedì 27 settembre 2016

Crochet: decorative stitch 1 - Uncinetto: punto decorativo 1

Crochet: decorative stitch 1 - Uncinetto: punto decorativo 1
Abbreviations:
Round = R
Chain stitch = ch
Slip stitch = sl st
Double crochet = dc
Triple crochet = tr

Always at start of each round:
ch3 count as the first dc;
ch4 count as the first tr.
Always at end of each round:
1sl st to close the round and 2 or 3sl st to reach the start of the new round (= 1sl st + 2 or 3sl st).


Abbreviazioni:
Giro = G
Catenella = cat.
Maglia bassissima = m.bss.
Maglia alta = m.a.
Maglia altissima = m.ass.

Sempre all'inizio di ciascun giro:
3cat. sostituiscono la prima m.a.;
4cat. sostituiscono la prima m.ass.
Sempre alla fine di ciascun giro:
1m.bss. per chiudere il giro e 2 o 3m.bss. per raggiungere il punto d'inizio del nuovo giro (= 1m.bss. + 2 o 3m.bss.).

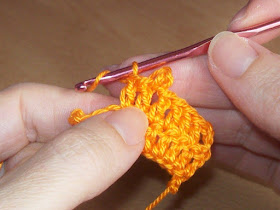
Crochet: decorative stitch 1 - Uncinetto: punto decorativo 1
R1: Begin with a Magic loop. 2dc - ch2 - *4dc - ch2*. Repeat from * to * 4 more times, 2dc. At end of R 1sl st + 2sl st.
R2: 3dc - ch3 - 3dc into the space formed from ch2 of the previous R, ch1.
Repeat all the way around. At end of R 1sl st + 3sl st.
R3: 3dc - ch3 - 3dc into the space formed from ch3 of the previous R, ch4.
Repeat all the way around. At end of R 1sl st + 3sl st.
R4: 3dc - ch3 - 3dc into the space formed from ch3 of the previous R, ch3 - 1dc - ch3 - 1dc over ch4 of the previous R, ch3.
Repeat all the way around. At end of R 1sl st + 3sl st.
R5: 3dc - ch3 - 3dc into the space formed from ch3 of the previous R, ch2 - 3dc - ch3 - 3dc into the space formed from ch3 between 2dc of the previous R, ch2.
Repeat all the way around. At end of R 1sl st + 3sl st.
R6: Repeat R3.
R7: 3dc - ch3 - 3dc into the space formed from ch3 of the previous R, ch2 - 1dc - ch3 - 1dc over ch4 of the previous R, ch2.
Repeat all the way around. At end of R 1sl st + 3sl st.
R8: 3dc - ch3 - 3dc into the space formed from ch3 of the previous R.
Repeat all the way around. At end of R 1sl st + 3sl st.
R9: Change colour. 3tr - ch3 - 3tr into the space formed from ch3 of the previous R.
Repeat all the way around. At end of R 1sl st + 3sl st.
R10: Change colour. 3tr - ch3 - 3tr into the space formed from ch3 of the previous R, ch2.
Repeat all the way around. At end of R 1sl st + 3sl st.
R11: Change colour. 4tr - ch4 - 4tr  into the space formed from ch3 of the previous R, ch2.
Repeat all the way around. At end of R 1sl st. Cut and fasten the yarn off.

G1: Iniziare con un anello magico. 2m.a. - 2cat. - *4m.a. - 2cat.*. Ripetere da * a * altre 4 volte, 2m.a.. Alla fine del G 1m.bss. + 2m.bss.
G2: 3 m.a. - 3cat. - 3m.a. nello spazio formato dalle 2cat. del G precedente, 1cat.
Ripetere per tutto il G. Alla fine del G 1m.bss. + 3m.bss.
G3: 3m.a. - 3cat. - 3m.a. nello spazio formato dalle 3cat. del G precedente, 4cat.
Ripetere per tutto il G. Alla fine del G 1m.bss. + 3m.bss.
G4: 3m.a. - 3cat. - 3m.a. nello spazio formato dalle 3cat. del G precedente, 3cat. - 1m.a. - 3cat. - 1m.a. sopra le 4cat. del G precedente, 3cat.
Ripetere per tutto il G. Alla fine del G 1m.bss. + 3m.bss.
G5: 3m.a. - 3cat. - 3m.a. nello spazio formato dalle 3cat. del G precedente, 2cat - 3m.a. - 3cat. - 3m.a. nello spazio formato dalle 3cat. tra le 2m.a. del G precedente, 2cat.
Ripetere per tutto il G. Alla fine del G 1m.bss. + 3m.bss.
G6: Ripetere il G3
G7: 3m.a. - 3cat. - 3m.a. nello spazio formato dalle 3cat. del G precedente, 2cat. - 1m.a. - 3cat. - 1m.a. sopra le 4cat. del G precedente, 2cat.
Ripetere per tutto il G. Alla fine del G 1m.bss. + 3m.bss.
G8: 3m.a. - 3cat. - 3m.a.  nello spazio formato dalle 3cat. del G precedente.
Ripetere per tutto il G. Alla fine del G 1m.bss. + 3m.bss.
G9: Cambiare colore. 3m.ass. - 3cat. - 3m.ass. nello spazio formato dalle 3cat. del G precedente.
Ripetere per tutto il G. Alla fine del G 1m.bss. + 3m.bss.
G10: Cambiare colore. 3m.ass. - 3cat. - 3m.ass. nello spazio formato dalle 3cat. del G precedente, 2cat. Ripetere per tutto il G. Alla fine del G 1m.bss. + 3m.bss.
G11: Cambiare colore. 4m.ass. - 4cat. - 4m.ass. nello spazio formato dalle 3cat. del G precedente, 2cat. Ripetere per tutto il G. Alla fine del G 1m.bss. Tagliare e affrancare il filo.
 

lunedì 19 settembre 2016

Tatting parure - Parure a chiacchierino

Tatting parure - Parure a chiacchierino
This parure is composed of four motifs very easy to make.
Materials I used are:
- thread size 5;
 - number 5 plastic rings 2 cm in diameter;
- number 6 plastic rings 1,8 cm in diameter;
- black beads;
- silver beads.
By clicking here you can watch the video to make this project.


Questa parure è composta da quattro motivi molto semplici da realizzare.
I materiali che ho usato sono;
- filo nr. 5
- 5 anelli di plastica del diametro di 2 cm;
- 6 anelli di plastica del diametro di 1,8 cm;
- perline nere;
- perline argento.
Cliccando qui protete vedere il video per realizzare questo progetto.

venerdì 9 settembre 2016

Crochet: how to make picot stitches - Uncinetto: come fare i picot

Picot is an ornamental stitch of the crochet used to complete an edge and also as joining element.
There are different types of this stitch: opened picot, closed picot, small picot, long picot.

I picot sono dei punti ornamentali dell'uncinetto, utilizzati per rifinire un bordo o anche come elementi di unione. Esistono diversi tipi di picot: picot aperto, picot chiuso, picot piccolo, picot lungo.

Opened picot is the easiest: work one or more single crochet along the edge as required in the pattern, make 3 chain stitches, work single crochet in the next stitiches as required.

Il picot aperto è il più semplice: lavorate una o più maglie basse lungo il bordo, come richiesto dal modello, fate 3 catenelle, lavorate le maglie basse nei punti successivi come richiesto.

Crochet: how to make picot stitches - Uncinetto: come fare i picot


Small picot and long picot: the difference is in the number of chain stitches worked, usually 3 for the small picot; 5 or 7 for the long picot.

Picot piccolo e picot lungo: la differenza risiede nel numero di catenelle da lavorare, generalmente 3 per il picot piccolo; 5 o 7 per il picot lungo.

Closed picot is the most common. Follow these steps to learn how to make it.

Il picot chiuso è il più comune. Seguite questi passaggi per imparare a realizzarlo.

After making the stitches as required in the pattern, work 3 ch.

Dopo aver lavorato i punti come indicato dal modello, lavorate 3 cat.

Crochet: how to make picot stitches - Uncinetto: come fare i picot

Insert hook into the first chain stitch, yarn over hook, make 1 slip stitch.

Inserite l'uncinetto nella prima catenella, prendete il filo e lavorate una maglia bassissima.

Crochet: how to make picot stitches - Uncinetto: come fare i picot

Picot is made. Continue following the pattern.

Il picot è completato. Continuate seguendo il modello.

Crochet: how to make picot stitches - Uncinetto: come fare i picot

lunedì 5 settembre 2016

Tatting: how to make split rings - Chiacchierino: come fare split ring

The split rings can be worked one after the other without the needed to make a chain between them.

Gli split ring possono essere lavorati uno di seguito all'altro senza la necessità di fare un arco tra di loro.

Tatting: how to make split rings - Chiacchierino: come fare split ring

To make a split ring we need two shuttles, so we can use one colour or two according to the pattern.
Make the first part of the ring in the usual way (generally it is the first half of the ring but it can be required a different number of double stitches between the first and the second part of the ring).

Per lavorare uno split ring abbiamo bisogno di due navette, di conseguenza possiamo utilizzare un colore solo oppure due, a seconda del modello.
Lavorate la prima parte dell'anello normalmente (generalmente si tratta della prima metà dell'anello stesso, ma può essere richiesto un numero diverso di nodini tra la prima e la seconda parte).

Tatting: how to make split rings - Chiacchierino: come fare split ring

To make the second part of the ring, drop the first shuttle and turn your hand upwards. Take the second shuttle and work the other part of ring. Start with the second half of the double stitch and be careful do not flip it.

Per lavorare la seconda parte dell'anello, lasciate andare la prima navetta e ruotate la mano verso l'alto. Prendete la seconda navetta e lavorate l'altra parte dell'anello. Iniziate con la seconda metà del nodino doppio facendo attenzione a non farlo capovolgere.

Tatting: how to make split rings - Chiacchierino: come fare split ring

Now work the first half of the double stitch, be careful do not flip it.

Adesso lavorate la prima metà del nodino doppio, facendo attenzione che anche questo non si capovolga.

Tatting: how to make split rings - Chiacchierino: come fare split ring

Once made the first double stitch, continue up to complete the ring.

Ottenuto il primo nodino continuate fino a completare l'anello.

Tatting: how to make split rings - Chiacchierino: come fare split ring

Take the first shuttle and close the ring as usual.

Prendete la prima navetta e chiudete l'anello come al solito.

Tatting: how to make split rings - Chiacchierino: come fare split ring

domenica 4 settembre 2016

Tatting: how to cover a plastic ring - Chiacchierino: come ricoprire un anello di plastica

Hold plastic ring and thread in your left hand and shuttle in your right hand. Keep the thread on the back of the ring.

Tenete l'anello di plastica e il filo con la mano sinistra, e la navetta con la mano destra. Mantenete il filo dietro l'anello.

Tatting: how to cover a plastic ring - Chiacchierino: come ricoprire un anello di plastica

Pull the thread up through the plastic ring from back to front, insert the shuttle through the loop made from the bottom to the top.

Tirate il filo attraverso l'anello di plastica da dietro in avanti, inserite la navetta nell'anello appena formato dal basso verso l'alto.

Tatting: how to cover a plastic ring - Chiacchierino: come ricoprire un anello di plastica

Pull the shuttle down and keep the thread on the front of the ring.

Tirate la navetta verso il basso e mantenete il filo davanti all'anello.

Tatting: how to cover a plastic ring - Chiacchierino: come ricoprire un anello di plastica

Pull the thread up through the plastic ring from front to back and insert the shuttle through the loop made from the bottom to the top.

Tirate il filo attraverso l'anello di plastica dal davanti verso dietro e inserite la navetta nell'anello appena formato dal basso verso l'alto.

Tatting: how to cover a plastic ring - Chiacchierino: come ricoprire un anello di plastica

The first double stitch is made.

Il primo nodino doppio è completato.

Tatting: how to cover a plastic ring - Chiacchierino: come ricoprire un anello di plastica

Make picot: insert a clip paper and work as before.

Per fare i picot: inserite una graffetta e lavorate come in precedenza.

Tatting: how to cover a plastic ring - Chiacchierino: come ricoprire un anello di plastica


Make ring: wrap the thread round the fingers and work an usual ring.

Fare un anello: avvolgere il filo intorno alle dita e lavorare un anello normalmente.

Tatting: how to cover a plastic ring - Chiacchierino: come ricoprire un anello di plastica